
Tight hamstrings could be causing you…
BACK PAIN, REFERRED LEG PAIN, DISCOMFORT, POOR POSITION, POOR AERODYNAMICS, and NECK PAIN
So read on…!


‘FUNCTIONAL ANATOMY’
Understanding where your hamstrings are and what they do when you are on the bike can help you get to grips with looking after them. The hamstring muscles at the back of the thigh originate at the base of your pelvis and then run down the back of your leg to cross the knee joint. They are extensors at the hip (meaning that they contribute to straightening your leg on the down stroke), and they are flexors at the knee (meaning that they bend your knee on the upstroke).
Imagine you are on your bike and think about these muscles and what they are doing. The pelvis end is constantly being stretched as you bend forwards to reach for the bars. The knee end on the other hand, is never stretched while you are sat in the saddle as your knee is constantly bent and circling. This combination can lead to tightness in the ‘lower hamstring’ at the knee, but actually good flexibility but often weakness in the ‘upper’ hamstring at the hip. Effectively in terms of how the muscle functions, the ‘upper’ hamstrings work with the gluts, and the ‘lower’ hamstrings work with the calves.
WHAT DOES THIS ALL MEAN???
So what? – you might think. Well, the important point is that wherever your hamstrings are short, upper or lower, you will encounter problems. As you reach for the pedal shortened hamstrings will pull down on the back of your pelvis and round your lower back, tucking your tail under and at the very least giving you a rather ugly position. This can have knock on effects up the whole of your spine leading to a more ‘rounded’ upper back (and moving you away from the more desirable ‘flat back’), and maybe even giving you a pain in the neck pain by way of compensation. The tighter your hamstrings, the greater the impact and the more likely you are to have a problem.
TIGHT HAMSTRINGS AND THEIR EFFECT ON SADDLE HEIGHT
The place where all of us start when setting up a bike is the saddle. Most riders experiment with saddle height and there is a lot of debate as to what the ‘right’ height should be. All these discussions are healthy and as with any debate there is no absolute answer. The same can be said about exercise. Debates come and go about ‘good’ ‘bad’ and ‘dangerous’ exercises, but the truth is that the answer is always relative to the person, their goal and the condition of their body. The same is true of saddle height.
The height of the saddle in a sense is just a reference to take an objective measure of the bike. The angle at the knee when the rider is sat and pedalling is the more important element. In regards to this I would say that an optimal ‘range’ would be from 145 to 155 degrees. This 10 degree band of variation represents a significant difference in saddle height and would feel radically different to the rider. In general more traditional road positions will be more towards the 145 end and a time trial or triathlon position would be more towards the 155 end.
The reason for this difference is largely due to the trade-off between comfort and power. At the lower end (145) there is less stretch and the position may feel more comfortable – especially for longer rides. A lower position will also tend to support a shallower pelvic angle or more ‘sat back’ position which is more appropriate for longer duration, lower intensity riding too.
At the higher end (150-155) the greater knee extension (leg stretch) facilitates more power giving more range on the down and up stroke. This higher saddle encourages a more forward position on the saddle and an increased pelvic tilt too – more appropriate for higher intensities and recruiting those important gluteal muscles (see previous bike fit blog). This position is probably less comfortable (certainly until you really work at it), and especially at lower intensities. Theoretically it will add to power at higher intensities where is may feel more productive – provided of course you have the flexibility!

SADDLE UP –POWER UP?
When I meet clients who have already had a bike fit it is far more common that their original saddle position has been raised as a result. Higher saddle set ups are more fashionable at the moment, and I think one of the reasons is because of the boom in power measuring devices that are being widely used as training tools. If a saddle is too low your power may be limited and moving it up in theory can help you get into a more powerful pelvic position to generate more force.
The only problem with this theory is that in practice this increased height may take your hamstrings beyond their comfortable range of movement. The length of the hamstrings and your flexibility should be factored in when setting up your position. You want to be sure that your hamstrings at the knee have a range of 150 degrees. This will mean you can happily pedal away without any problems or tension being transferred to the pelvis, back and neck with a saddle height that correlates to a 150 degree knee bend. If you are riding a higher saddle you need to be even more flexible. This is why I set this range as a minimum ‘ideal’ for any cyclist, and will recommend stretching for any rider with less flexibility than this.
TESTING YOUR OWN HAMSTRINGS AND LEARNING TO STRETCH THEM CORRECTLY
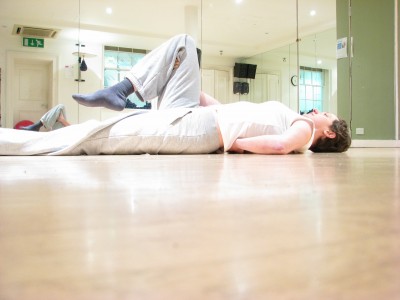
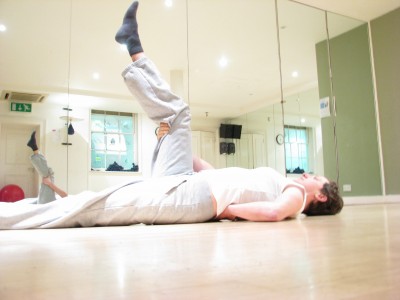
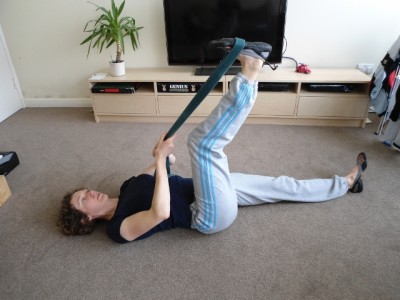
Then to use this same movement as a stretch, focus on arching your lower back and maintaining the gap underneath you as you straighten your leg upwards. Stop at the point just before your back begins to flatten down onto your hand. Once you have got the hang of maintaining an arch under your lower back against the pull of your hamstrings you can use a strap to add a little more ‘pull’ to the stretch (see below), but DON’T ALLOW YOUR LOWER BACK TO FLATTEN or you will no longer be targeting the key tight spot. This stretch targets the ‘lower hamstrings’, the tightest part for many cyclists and can start to improve your flexibility and riding position.
COMMON MISTAKES
I am not saying that all other hamstring stretches are ‘bad’ or ‘wrong’, but most that I see do not effectively target the shortest end at the knee, and are not isolated stretches but ‘combinations’. Any stretch where the lower back is rounded can be considered a ‘combination stretch’ and will not hit the tightest part of the muscle group or change the length of the hamstrings effectively. Here are some common examples:
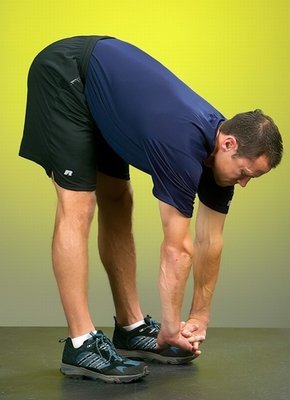
SEATED STRETCHES:

NOT ISOLATED ENOUGH

In contrast here is the isolated ‘lower’ hamstring stretch performed with a strap…
So there it is…simple but effective. If the news on this test was bad, don’t panic! With the correct, targeted stretch big improvements can come quite quickly and you will really feel the difference. I have had numerous examples where this stretch alone has eliminated back pain completely. If you would like to learn more about Stretching for Cyclists then I have a workshop coming up in September at le Beau velo in Shoreditch. Places are limited so get in touch to book if you are keen. Go to the workshops page of this website for more information…